While you Build

Overview

Effective form building relies on consistent structure, accurate configuration, and clear logic. Strong design supports a smooth user experience, reduces confusion, and ensures proper routing and data handling. Because every configuration choice impacts how a form functions, the following guidelines outline what must be reviewed and set during the build phase to maintain quality, accessibility, and reliability across all forms.

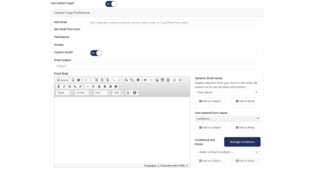
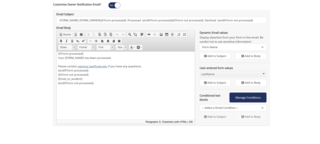
Form-Level Configuration

This section walks through the essential form-level configuration settings you’ll use most often. Following these recommendations helps keep your form structured and functioning smoothly.

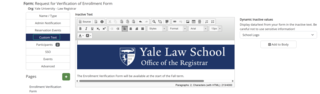
Name / Type Settings 
  • Form Name / Display Name / Description - Must be clear, unique, and meaningful for users and designers.
Name/Display/Description
  • Duplicate E-Signature Check - Set to ignore duplicate submissions, unless the form must prevent the same individual from submitting more than once.
duplicate e-signature check
  • Reminder Email Frequency (up to 90 days) - Set appropriately to prompt participants without overwhelming them.
Email Frequency
  • Owner notification email options – Most commonly set to When Completed; adjust as needed based on workflow and notification requirements. 
owner notification email options
  • Custom opt-out notification – Provide the message participants see if opting out of the e-signature.

    NOTE: The suggested Standard Text is available on the Name/Type page under E-signature Opt-Out Notification

opt-out signature
  • Form Timer - Turn OFF (default is ON; should only be used if the form requires timed completion).
form timer
  • Welcome Screen - Default is OFF, not commonly used. 
Welcome screen
  • Recaptcha Validation - Not used; suggested if external users are allowed.
recaptcha validation
  • Automatic Activation - Suggested when the form is only available during specific dates each year. If the open/close dates are the same annually, set the “From” and “To” dates here so the form activates and deactivates automatically without manual updates.
Automatic Automation
  • Prompt Before Submitting – Suggested for signature widget or no signature forms; use if there is a default or customized prompt you would like the user to acknowledge before submitting the form.

    NOTE: Enabling this option displays Use Custom Prompt Text. To edit the message, Use Custom Prompt Text must be enabled

prompt user before submitting
  • Notify Users When Rejected Over – Enable to notify applicants when their form is rejected due to a rule, condition, or exceeded quota.
notify users when rejected over
  • Allow External Users - Only enable when necessary and approved in the Requirements Document; validate Recaptcha Validation is enabled to reduce risk of spam or bots.
allow external users
Admin Notification - Optional
  • Notification Frequency - Determine how often admins are notified to avoid email overload.
notification frequency
  • Email Recipient List - Ensure addresses are accurate, separate multiple emails with semicolons.
Email recipient list
  • Custom Email Option - Recommended so the email content is specific to those receiving it.

    NOTE: Custom email must be enabled to edit the email details.

custom email
Custom Text
  • Inactive Text – Required; message shown when the form is deactivated. Must explain why the form is inaccessible or provide alternative instructions.
inactive text
Participants
  • Form Workflow Type - Most commonly Route Sequentially; other options can be selected if more applicable.

    NOTE: See the Workflow Type page and related subpages for detailed guidance, including conditional workflows when applicable.

workflow type
  • Hide Unused Signature Lines - Strongly suggested; Ensure it is enabled to hide irrelevant signature fields. 
hide unused signature lines

Participant 1 (Form Owner/Initiator)

NOTE: As shown below, the Owner option should be set to Yes for the first participant (Form Owner), which is the default.
 

Owner enabled
  • E-Signature - Enabled by default; should remain enabled unless the participant is not required to sign.

    NOTE: For more information related to configuring a participant’s signature in the form, visit the Add Signature(s) page

submission type
  • Requires Authentication - Not editable when E-Signature is enabled.

    NOTE: Selecting No Sign allows authentication to be disabled. If authentication is disabled, the Allow Saving Drafts option is removed.

requires authentication
  • Preferred Name at E-sign - Should be enabled; not editable if ‘No Sign’ is selected.
preferred name at e-sign
  • Allow Saving Drafts - Toggle to NO; only enable when necessary (long forms, info gathering, or regulatory reasons).
allow saving drafts
  • SSO Link in Notification - Required in the notification email for internal participants who access the form using Single Sign-On (CAS login).
SSO Link in Notification
  • Confirmation Email – Sent to participant to acknowledge completion. Suggested for form owner so they are aware their submission went through.
send confirmation email
  • Customize Confirmation Email (subject + body) - Strongly recommended if Confirmation Email is enabled.
Customize confirmation email
  • Carbon Copy - Optional; designate recipients (emails, participants, or groups) and tailor the notification’s subject line and body as needed.

    NOTE: Carbon Copy must be enabled to access Add Email, Get Email from Form, Participants, and Groups. Enable Custom Email to edit the subject line and message body.

carbon copy options
  • Instruction Text (only an option for editing participant 1) - Optional; provide necessary guidance to complete the form.
Instruction Text
  • Confirmation Text - Required; must include plain-language confirmation, department logo, and next steps. 

    NOTE: Suggested default wording is available at Form Level Settings – Other 

Confirmation Text

Additional Participants - Includes all settings from Participant 1 unless noted above. Only unique or different settings are explained here.

NOTE: Both Owner and School should be set to Off unless the School option (circled in red below) has been validated and approved prior to the build.

Additional Participants
  • Allow Repeat Signatures - Only enable if the participant may need to sign more than once.
Allow repeat signatures
  • Allow Return for Revision - Turn on when the participant may need to send the form back to the previous participant.

    NOTE: Visit the Allow Return for Revision page for a step-by-step guide on Return for Revisions 

Allow return for revision
  • Can Return to Anyone- Enable if the participant should have the ability to send the form back to any participant.

    NOTE: Allow Return for Revision must be enabled to view the option to Return to Anyone.

Can return to anyone option
  • Auto-Escalate - Enable when routing must continue automatically after inactivity.
Auto-escalate
  • Designation Options - Choose how the participant is identified (specified by user, API, groups, multiple users, etc.).

    NOTE: 

    • Visit the Designate Participants page under Add Multiple Participants for detailed guidance on designating participants efficiently. 
    • Depending on the designation selected, additional information may be required. Ensure the correct designation option is chosen.
designate participant
  • Customize Cosigner Email - Required; enable Customize cosigner email and include the cosigner hyperlink, either from Dynamic Email Values or by using Automatically insert cosigner link, so co-signers receive a direct link to complete their section once the prior participant submits. Be sure to edit the subject and body to provide the appropriate instructions.
Customize cosigner email
  • Customize Owner Notification Email - Required; enable Customize Owner Notification and include the information the form owner needs once co-signers finish their section, adjusting the subject, body, and any instructions as appropriate.
Customize owner notification email

Page & Item Design

This section highlights the essential standards for structuring forms and its items, with an emphasis on clear titles, appropriate field types, and consistent naming. These practices help keep the form organized and easy to maintain.

Standards & Structure
  • Department Logos - Must match official branding standards.
Department Logo
  • Titles - Must be accurate and descriptive.
Form Title
  • Purpose / Instructions - Clearly state why the form exists and what the participant must do.
Purpose and Instructions example
  • Section Headers - Clearly label and organize content sections to guide users through the form.
heading options
  • Line Breaks & Spacing - Use consistent spacing and line breaks to visually separate sections and improve overall readability.
Line breaks and spacing
  • Form Items & Table Widths – Size form items and tables appropriately to prevent text wrapping, cut off text, or horizontal scrolling to ensure content is easy to read and access.

    NOTE: A table’s width should not exceed 900px. Form item and table widths can be adjusted as needed to meet standards and accessibility requirements.

width for tables and fields
  • Participant Information - Validate required identifiers are configured to be captured or prefilled from Banner, User Profile, or other sources to reduce manual entry and maintain accurate routing.

    NOTE: If a field is prefilled, ensure ‘Allow users to edit this field?’ (circled in red) is set to NO.

Prefill source and with
  • Field Types - Select the appropriate form item type based on the expected format (e.g., email, phone number, date, number) to ensure proper validation and prevent user entry errors.
Field type
  • Required Fields - Mark inputs that must be answered as required to prevent incomplete submissions.
required field
  • Hard Stops – Use only when a submission must be blocked to prevent invalid or noncompliant outcomes; ensure the message clearly explains why the user cannot proceed.

    NOTE: For more information related to creating or updating hard stops, please visit the Hard Stops page.

Hard stop example
  • Rules & Logic – Implement logic and rules to ensure that fields, sections, and routing function correctly for every participant response as applicable.

    NOTE: For detailed information on creating and adding rules please visit the Rules page.

rules example
Form Item Labeling & Abbreviations

Strongly suggested, especially for heavy rule logic or when reusing items across forms.

  • Use consistent abbreviations for form item types:
    • RB = Radio Button
    • DD = Dropdown
    • CB = Check Box
    • SA = Short Answer
    • LA = Long Answer
       
Abbreviations example
  • Use consistent naming conventions across pages and form items to keep the build clean and easy to follow

    Examples: student_formitemname_text, advisor_tablename_table, notstudent_hardstop_text, etc.
     

Naming examples

Before You Finish: Final Review Summary

This section focuses on the final review at the end of the build process. The goal is to confirm that all settings, items, and rules are fully configured so the form functions as intended. This final check helps catch missed settings, incomplete updates, or features that weren’t fully enabled.

Field Behavior & Logic
  • Required Fields - Confirm that all required inputs are enforced correctly and prevent incomplete submissions.
  • Field Types & Validation - Verify email, phone, date, number, and other specialized fields accept only valid input.
  • Conditional Visibility/Skip Logic - Test all rules to ensure the right items display or hide based on responses.
  • Naming Consistency - Make sure page and item names follow your conventions for easier updates and troubleshooting.
  • Participant Information - Validate that required participant identifiers (Name, NetID, Email, etc.) are correctly configured and prefilled from User Profile or other sources.
  • Hard Stops – Verify hard stops trigger only when intended and clearly explain why the user cannot proceed.
  • Rules & Logic – Test that all conditional rules, skip logic, and field requirements trigger correctly for all responses.
Routing & Workflow Behavior
  • Routing Sequence - Confirm that the form routes to participants in the correct order.
  • Visibility Rules - Ensure participants see only the fields and pages relevant to their role.
  • Return-for-Revision - (If enabled) Verify the form returns properly when updates are needed.
Data Flow & Integrations
  • Prefill Sources - Confirm that any fields configured to prefill display the correct data from their source when applicable.
  • Notifications - Test emails or alerts for correct recipients, content, and timing.
Usability & Clarity
  • Page Layout & Readability - Check titles, instructions, spacing, widths, and section breaks for clarity.
  • Duplicate / Unnecessary Items - Remove any leftover test fields or redundant items.
  • End-to-End Preview - Walk through the entire form as a test user to confirm all updates, logic, and settings function properly.
Related Information:
  • For further information related to Testing your Form, press the link or go to Designer Resources >Testing your Form
    • As well as, Impersonation Testing or go to Designer Resources > Testing your Form > Impersonation Testing
  • For more information related to Configuring Emails please visit the Participant Emails page or go to Designer Resources > Participant Emails
  • For helpful information pertaining to best practices and general form building suggestions visit the Before You Build page and the available resources or go to Designer Resources > Before You Build
     

Questions? Contact Dynamic Forms ITS Team by emailing DynamicForms.ITS@yale.edu