Hard Stops

Overview

Hard stops prevent a form from being submitted until all required information, selections, and routing details are complete and valid. They ensure accuracy, prevent misrouting, and make sure the form follows the correct workflow and institutional policies.

This section explains what hard stops are, why they’re helpful, and how to add or update them in your form.

Why Are Hard Stops Helpful?

  • Prevent submission when required fields, selections, or uploads are missing.
  • Confirm the user is eligible to use the form (correct school/college/department, workflow role, program).
  • Block submission when an invalid value is selected and provide clear instructions.
  • Ensure the system has the correct data for routing, conditions, and subsequent rules.
  • Reduce manual corrections, returned forms, and unnecessary back-and-forth communication.
  • Enforce rules consistently across all submissions, preventing skipped steps or exceptions.
  • Ensure users see clear instructions when something must be corrected before they can continue.
How to Add a Hard Stop to a Form

Identify what needs to be enforced

Examples:

  • Correct identity or access (NetID required, participant type, college code, etc.)
  • Correct school/department/program (e.g., Dining Services, must be Law School, etc.)
  • Correct section completed (if other participant fields are visible)
  • Invalid or disallowed values (closed term, restricted course, wrong program, etc.)
  • Incorrect formats (phone number format, value must begin with a specific number, etc.)
  • Email restrictions (must use a non-Yale email or must use a Yale email)
  • Duplicate or unchanged values (new value matches the old value)
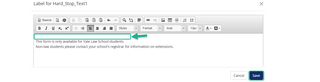
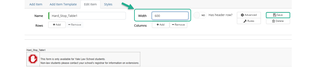
  • Policy-based blockers (must acknowledge required information first, selected option violates institutional rules, etc.
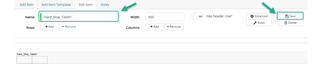
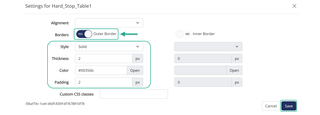
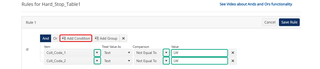
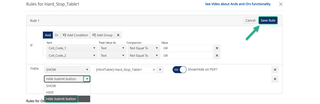
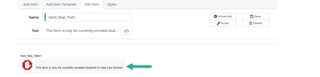
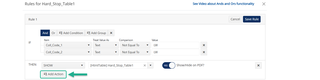
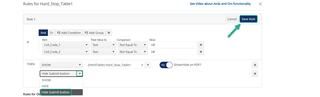
Create the Hard Stop

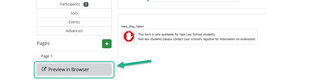
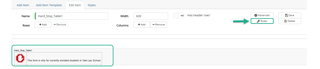
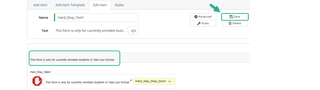
  1. Add a table to your form and assign it a descriptive name that reflects its purpose. Then click Save 

    For example, ‘Hard_Stop_Table1’
     

add a hard stop table
  1. Add a Text & HTML item in the second column of the table and name it to match the purpose of the table or hard stop
Add name to table

       Enter the text explaining the requirement and what the user should do if they do not meet it, then          click Save

       For example, ‘This form is only available for Yale Law School students. Non-law students please                contact your school’s registrar for information on extensions.’

Add text to hard stop
  1. Add an Image item into the first column of your table, give it a descriptive name related to the hard stop
Add image into first column

            Turn off ‘Decorative?’ and add the alt text that explains the image (i.e., Hard Stop image)

add alt text to image

     Go to advanced and select the most recently uploaded ‘Stop Sign for Errors..’ PNG, scroll down to            the bottom and click Save

add hard stop image
Click save
  1. Your table should now resemble the layout shown below
how table should look completed

Helpful Tips:

  • Preview in Browser to see how the table appears to users
Preview in browser
  • To make the table stand out: 

    Select the table and go to Advanced

Go to advanced

        In the window that opens, enable Outer Border. You can adjust the style, thickness, color, and                     padding as needed, then click Save.

        NOTE: Make sure any styling follows Yale’s Best Practices (such as using approved color                           codes).

Adjust the tables border
  • If the spacing looks off, adjust the text by adding space above, as shown circled in green
Add space above text
  • If the text and image are too far apart, reduce the table’s Width to bring them closer together
Decrease table width

       Always click Save after making any changes

  1. Once the hard stop is set up, create the rule that will trigger when the user does not meet the requirement described in the hard stop. Select the table and then click Rules 
Add rule to table
  1. In the window that opens, select Add a New Rule
add a new rule
  1. In the IF section of the rule, select the form items that determine whether the hard stop condition is met

    For example, if using College Code form items—if neither code is equal to “LW,” we know the user is not a Law student

    NOTE: In the example below, two IF conditions are used because the form contains two College Code fields. To add more conditions, click Add Condition (circled in red)

Add IF conditions
  1. In the THEN section of the rule, choose SHOW in the first dropdown. Then select the Hard Stop table in the second dropdown

    NOTE: Ensure Show/Hide on PDF is enabled (circled in red below)

set SHOW for hard stop table

         Then select Add Action

Add action to condition
  1. In the dropdown that appears, select Hide Submit Button, then click Save Rule
Hide submit button for condition
Updating an Older Hard Stop

If your form has existing hard stops that were created using the older format, use the steps below to update them. 

The image below shows what an outdated hard stop looks like.
 

Outdated hard stop table
  1. Above the outdated hard stop table, drag in a new Text & HTML item (circled in green below). Name it appropriately, then type or copy the old text into it, and click Save
Copy in the old text
  1. Press on the outdated dropdown and delete it 
Delete outdated dropdown
  1. Then drag in the text into the second column of the original table
Move text into the table
  1. Select the table being updated and find the rule associated with that hard stop. Click Edit Rule
Select table and go to rules
edit rule for hard stop
  1. Select Add Action
Add action
  1. From the additional THEN dropdown, choose Hide Submit Button, then click Save Rule
Hide submit button for condition
Related Information

For more information related to Form items, go to Form Items (Designer Resources > Form Items )

For more information related to Rules, go to Rules (Designer Resources > Form Items > Rules)

For more information related to Best Practices, go to Best Practices (Designer Resources > Before You Build > Best Practices)

Questions? Contact Dynamic Forms ITS Team by emailing DynamicForms.ITS@yale.edu