Access Form Submissions
How to Access Form Submissions
This page explains how you can access your forms submissions as an Admin and use its features.
Prerequisites:
1. Access - Must ensure your resource has access to your departments Organization where your form is located and the correct type of Admin access.
NOTE: All Designers already have Full Form Admin Access.
- Types of Access and Requesting Access: https://forms.sis.yale.edu/home/types-access
2. Dynamic Forms URL - Must ensure you have the correct URL to access Dynamic Forms.
- Dynamic Forms site: https://nextgensso.com/sp/startSSO.ping?PartnerIdpId=https://auth.yale.edu/idp/shibboleth&TargetResource=https://dynamicforms.ngwebsolutions.com
- Bookmarking/Saving URL: https://forms.sis.yale.edu/designer-resources/bookmarking-dynamic-forms-site
Process:
1. Access Dynamic Forms site and go to your Organization that contains your form.
- Accessing your Organization: https://forms.sis.yale.edu/designer-resources/start-building-form/your-organizations-settings
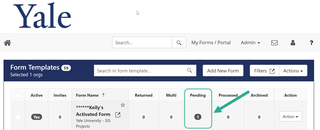
2. Access your Forms new submissions by clicking the number under Pending queue for your Form.
When a form has been completed (by all participants, if a multi-participant form) the new submissions will be found in the Pending queue. Form submissions will stay in the Pending queue until they are either manually moved to another work queue by an Admin/Designer or they may be automatically moved to the Processed queue after being copied to your shared drive/folder when processed by the Dynamic Forms Exchange process (DFE).
- Description of Work Queues: https://forms.sis.yale.edu/administrator-resources/admin-options
- DFE to Shared Drive/Folder: https://forms.sis.yale.edu/administrator-resources/access-form-submissions/dfe-shared-drive-folder
Click on the number found under the Pending queue, as seen below circled in green: