Creating a Form Mockup
A form mockup is a draft version of your form (normally created in a Word document). It identifies each question, section, and field type before you start building in Dynamic Forms. Creating a mockup helps you visualize how the form will look and assures all required information is captured accurately.
Process:
- Gather requirements - Work with your department or stakeholders to identify the form’s purpose, participants, and the data that needs to be collected.
- Organize sections - List all sections and questions in a logical order (for example, Requester Information → Request Details → Review/Approval).
- Define field types - Note each field’s type, such as Short Answer, Dropdown, Checkbox, File Upload, etc., for easy reference.
- Identify form rules - Identify where specific fields or sections should appear based on responses (for example, if “Approved” is selected, display the approval details table).
- Confirm required fields and field types - Indicate which fields are required (using an orange asterisk *) and note any field types (i.e., email format, phone number) or prefills (i.e., API, User Profile) needed.
- Add form configurations and email settings - Document system-level settings and automated communications that need to be configured once the form is built.
- Form Configurations: Identify which features should be enabled at the form level, such as Workflow, Admin Notifications, and Custom Text, as well as participant-specific options like Return for Revision and Allow Saving Drafts.
- Form-Related Emails: List all participant emails (for example, Student Confirmation Email, Office Co-Signer Email, Office Confirmation Email, and Owner Notification Email). Include:
- When the email should send (e.g., after student submission, after office upload)
- The email subject line, body, and footer
- Any conditional emails triggered by specific form responses (for example, Approved vs. Denied)
- Review and submit - Share the mockup with your department or anyone involved in creating the form for review, then submit it to the Dynamic Forms Team for review/approval before beginning the form build.
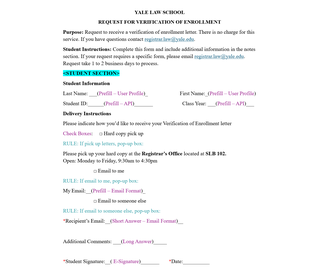
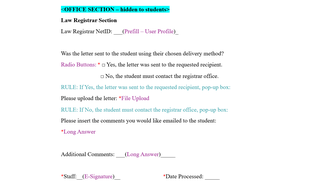
Below is an example of a simple form mockup. It shows how a mockup should be structured and what details it should include.