Building a Form Workflow Diagram
The form workflow defines how the form moves between participants — for example, from a student to a department, then to the registrar. Planning this workflow ahead of time helps you set up participant roles, email notifications, and routing conditions correctly.
Workflow Overview:
- Form Owner (first participant) – The process begins when the initial participant/form owner completes and submits their section.
- Co-Signer Routing – Based on the workflow setup, the form automatically routes to the next applicable reviewer(s) or approver(s) in the process. Conditional logic must be identified in this step.
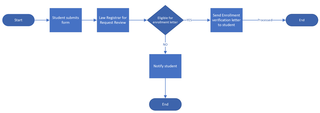
- Each participant completes their assigned section. Identify if information collected in this section will determine who the form is routed to next or if the workflow ends. For example, whether the form is approved and moves forward for processing, or denied and requires follow-up actions or notifications.
Below is an example workflow for the sample form mockup above.