Workflow Condition Types

Participants condition vs Action conditions

There are lots of different possibilities with workflows and conditions but I’m hoping this information will help you get a better understanding of how to use the system and the different conditions we have available.

There are those 2 types of conditions – Participant Conditions and Action Conditions.

Participant Conditions

These are represented by a number directly to the right of the participant’s name and are located inside of the action.

Workflow Participant Condition

You would use this type of condition if you wanted to skip a participant in your workflow. By placing the condition on the participant level, it tells the workflow “if this condition is true, send an email to this person to complete the form, if not, skip this participant and move on to the next”.

This is also helpful if you have multiple participants within the same action. For example, let’s say there’s a possibility of having multiple approvers (Approver 1, Approver 2, Approver 3 and Approver 4) but you only want the form to go to however many approvers are designated on the form. You could place all 4 approvers in the same action box with a condition on each approver. The conditions can say anything from “IF Approver1Checkbox is Answered” or “IF Approver1Email is Answered” to make sure it should go to that approver. By having the condition on each approver, the workflow will look at the form, see which approvers are selected or have info, then look at the conditions on the participant side and say for example, only approver 1 and 2 have been selected, then skip approver 3 and 4 because their conditions were false. The main thing to note with placing all of the participants within one action is that step of the workflow is treated as a broadcast, meaning all participants who’s conditions are true will receive an email at the same time and the workflow will move onto the next step/action once all of the required signatures in that action are collected.

If you only have one participant in the action but place a condition on the participant, if the condition is true, it will collect that participants signature on the form, if it is false, it will skip that participant and step entirely (since there’s only one participant in the action) and move onto the next step/action.

Add a Participant Condition

To add a participant condition, select the participant in the workflow that you want to add a condition to.

Select the first option, “Edit this workflow action”.

Image showing the menu with a green box and arrow pointing to "Edit This Workflow Action"
 

Click the “Conditions” button and add your condition(s) in the if-else format.

Image showing the Edit Workflow Action page with a green box highlighting the "Conditions" button.

You have the ability to add numerous conditions to a single participant by clicking the ‘Add condition’ button.

Image showing the Add Workflow Condition page with green arrows pointing to the editable fields and a green box highlighting the "Add condition" button.

When you are done, click “Save”. The number of conditions that are added will be represented by the number in the circle.

Image showing the Edit Workflow Action page with a green arrow pointing to the circled number 2 above "Conditions" which means that  2 conditions have been added to that participant.

Action Conditions

These are represented by a number at the top-right of the action box.

Workflow Action Condition

You use these conditions if your workflow splits or if you want your workflow to end entirely if a certain condition is met. When I say “if your workflow splits”, I mean if your workflow branches off into different paths. For example, a form can start with a student, then go to either the school or their parent like this:

            Student
            /           \
   School        Parent

When the workflow splits down different paths, we need to use the action conditions to tell the system which path to choose. If there are no conditions but the workflow is designed this way, it will always go down the first (leftmost) path. If there is only one participant in the actions where the split occurs (School and Parent in this example), you could also achieve this same workflow by placing both participants in one action, having the workflow go down one straight line instead of splitting, and placing a condition on both participants instead. One thing to note when designing a workflow that branches off down different paths is that you’ll need to place the action condition on the first action where the different path starts. For example, if the workflow was designed this way:

            Student
            /           \
   Advisor       Parent
          |               |
      Dean      HS Councelor

In this example, the split occurred at the second level (advisor and parent). That being said, you’d only need to place action conditions only on the Advisor action and the Parent action even though there are other actions/steps beneath them. Once the workflow goes down a certain path, it continues to go down that path until another split or another condition is found. If your workflow split down 15 different paths, you’d need to place 15 unique action conditions at the start of each of those different paths. If no conditions found are true, it will again revert down the first (leftmost) path it sees.

The last thing I could think of with using an action condition would be to stop a form from moving forward to any other participants. If you have one straight/linear path that goes for example from Student > Advisor 1 > Advisor 2 > Dean but there’s a possible situation where if Advisor 1 denies the request or form, Advisor 2 and the Dean no longer need to see the form. Instead of placing participant conditions on Advisor 2 and the Dean to check if Advisor 1 approved, you can place an action condition on Advisor 2’s action to check and say “IF Advisor1Dropdown is equal to Approve”. By doing this, if Advisor 1 does approve, the condition is true and it will request Advisor 2 and the Dean to sign the form. If the condition was false, it would stop after Advisor 1’s signature was collected, skip Advisor 2 and the Dean, then land in the Pending queue.

Add an Action Condition

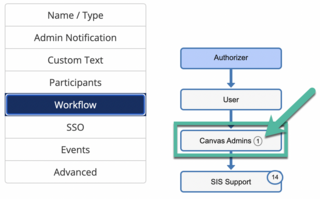
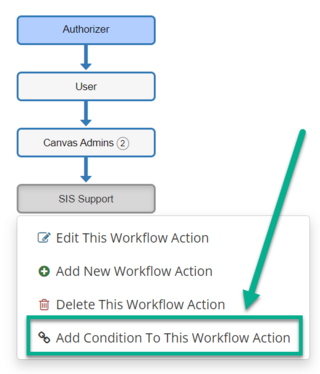
To add an action condition, first select the step in the workflow where you want an action condition to occur.

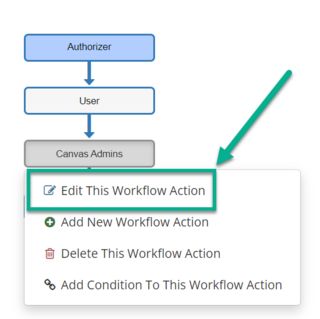
Select “Add condition to this workflow action.”

You have the ability to add numerous conditions to a single action by clicking the ‘Add condition’ button.

When you are done, click “Save”. The number of conditions that are added will be represented by the number in the circle.

Default Workflow

If your workflow is split and you do not have a condition on the actions themselves, your workflow will always resort to the left-most path. That being said, for the example where the condition is on the action for the left path but not the right, if the condition on the action is true it will go down that path - if it is false, it will go down the path on the right. If you had conditions on both of those actions and both conditions are false, it will go to the left-most path it finds.

Questions? Contact Dynamic Forms ITS Team by emailing DynamicForms.ITS@yale.edu