Start Building a Form

How to start building a Dynamic Form

Before you begin, ensure you have an Organization for your department in Dynamic Forms and Designer access. 

Add New Form Template

1. Log into Dynamic Forms by clicking the below URL and CASing in using your NetID and Password. 

Dynamic Forms URL

cas login img

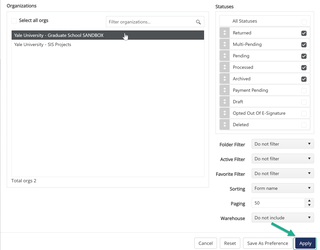
2. Select your Organization’s Sandbox by clicking Filters and click Apply. 

To view further details pertaining to accessing your Organization visit Accessing your Organization.

filter img
organization selection

3. To start building a new form, click Add New Form.

To view further details pertaining to Adding a New Form and requirements related to Forms, visit Add a New Form. 

add a new form

4. Enter your new forms name (can be modified later) and corresponding organization then click Add New Template.

new form template

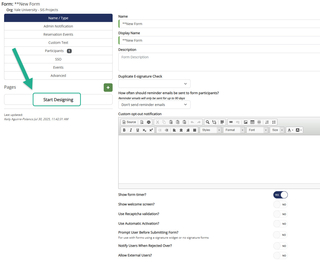
5. Click Start Designing (under pages) to begin creating your new form’s first page.

To configure your form level setting visit Form Level Settings. 

Start Designing img

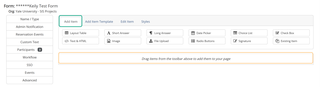
6. Under the Add Item tab (circled in green below), you can now begin dragging and dropping Form Items into the Form Designing space (circled in yellow below).

When you drag and drop a Form Items into the Designing space, it will highlight the area gray to show you where you are dropping the Form Item. 

add item tab

Related Information for Building Forms

Go to Best Practices to learn about Form Requirements, Guidelines and Tips while building a Form.

See Form Items (Designer Resources > Form Items) for details around each Form Item, their configuration settings and advanced settings. Check out the following features under Form Items:

Check out other Designer Resources for further details on how to configure features and to view other helpful information related to Dynamic Forms: 

  • Accessing your Organization - Details on different Organizations available to you, Organization settings that you can configure, and how to access Organizations. 
  • Yale Accessibility - Review accessibility guidelines to ensure your form meets ADA/WCAG standards and delivers an inclusive user experience. 
  • Form Level Settings - Details pertaining to the setting you can configure at the form level.
  • Add Multiple Participants - How to enable, add and configure multiple participants.
    • Edit Participant - Review how to modify participant details after they have been added to the form.
    • Allow Return (For Revision) - Learn how to enable and manage the option for participants to return forms for updates or corrections.
    • Designate Participants - Learn how to choose how each participant is assigned, whether specified by the owner, selected from a list, or pulled from form responses or APIs.
  • Participant Emails - Learn how to configure automated participant-facing emails triggered throughout the form process.
  • Workflow Type - Learn about the available workflow structures and how each one determines participant order and routing paths. 
    • Workflow Condition Types - Explore the various condition types used to define routing rules and workflow behavior. As well as, how to configure Conditional Routing
  • Add Signature(s) - E-signature options and how to configure.

Questions? Contact Dynamic Forms ITS Team by emailing DynamicForms.ITS@yale.edu