Activate/Deactivate Form 

Activating your form will allows Participants to access the form to be completed and submitted. 

Deactivating your form will make the form inaccessible so no further submissions can be accepted. 

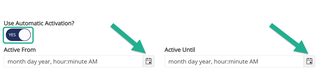
Forms can be manually Activated and Deactivated or set to automatically Activate and/or Deactivate based on a Date and/or Time. 
NOTE: Identifying an automatic Activation Date/Time without identifying an automatic Deactivation Date/Time will cause your form to stay active always. I.e. If you try and manually Deactivate the form, it will continuously re-Activate due to the automatic Activation being set without automatic Deactivation. 

A dark grey circle labeled ‘Yes’ represents an Activated Form and a red circle labeled ‘No’ represents a Deactivated Form, as seen below:

activated and deactivated

Manual

Within your Organization, find your Form Template Name and click the drop down on the Action button.

Then select Activate Form Template or Deactivate Form Template, as seen below:

Activate and Deactivate Form

Automatic

Within your Organization, find your Form Template Name and click the drop down on the Action button.

Select Edit Form Template and click on the Name/Type menu found in the upper left. 

Scroll towards the bottom and find Use Automatic Activation? and select Yes to enable the automatic Activation and/or Deactivation. 


Active Automation

Click on the calendar icon to select the Date and/or Time. 

You may choose to use only Automatic Activation, only Automatic Deactivation, or enable both.

Automatic Automation

*REMEMBER TO CLICK SAVE, highlighted in Orange at the bottom of the screen, after modifying settings and before moving to another area.

Save Button

Questions? Contact Dynamic Forms ITS Team by emailing DynamicForms.ITS@yale.edu