Since the NetID will only be populated after an Advisor has entered the form, we can configure a Rule that states:
- IF Advisor_NetID (Treat Value As: Text) Is Answered;
THEN SHOW Advisor_Section_Table - Show on PDF.
(THEN SHOW - List all Form Items that should only be displayed when NetID is populated/specific Participant has accessed the form)
This means the Student won’t be able to see the Advisor’s section, since the Advisor’s NetID won’t be prefilled yet. Once the Advisor accesses the form, their NetID will be prefilled and based on the Rule configured, the Advisor’s section will be displayed. Therefore, only the Advisor will see the Advisor section.
If you don’t want the Advisor’s NetID displayed on the form, you can configure another Rule that states:
- IF Advisor_NetID (Treat Value As: Text) Is Answered,
OR IF Advisor_NetID (Treat Value As: Text) Is Not Answered;
THEN HIDE Advisor_NetID - Hide on PDF.
Therefore, the Advisor’s NetID will always be hidden and never displayed on the form or PDF.
FORM EXAMPLE that uses these Rules can be found in:
- Organization: eForm Designer Sandbox
Form Name: 0 - (Example Form) Yale College - Sophomore-Year College Advising Form
Form Item: AdvisorNetID
Rules: See Rule 1 where it’s configured to always hide the AdvisorNetID and Rule 2 which shows a set of questions only when AdvisorNetID is Answered.
EXAMPLE 2 - Display a dynamic number of form items based on input
Let’s say you’re asking a Student to identify the number of children under their Yale Health Plan to determine the amount of financial aid they qualify for and need to collect their children’s details. You can ask the Participant/Student to enter their number of children and based on that response display an equal number of set questions. Creating rules that state if number of children = 1, then display Table 1 which includes 1 set of questions, if children = 2, then display Table 2 which includes 2 sets of questions and so on. But that would be inefficient and create a lot of unnecessary empty columns on the back end in the work queue.
Instead, create rules where the Condition uses the Comparison of Greater Than and the Value that references the number of children, in increments of 1, with the Action that shows 1 additional Table or set of questions for each child based on the Student’s input.
So you would configure rules that state:
- IF No_of_Children (Treat Value As: Number) is Greater Than 0;
THEN SHOW Child1_Table - Show on PDF.
- IF No_of_Children (Treat Value As: Number) is Greater Than 1;
THEN SHOW Child2_Table - Show on PDF.
- IF No_of_Children (Treat Value As: Number) is Greater Than 2;
THEN SHOW Child3_Table - Show on PDF.
- IF No_of_Children (Treat Value As: Number) is Greater Than3;
THEN SHOW Child4_Table - Show on PDF.
- IF No_of_Children (Treat Value As: Number) is Greater Than 4;
THEN SHOW Child5_Table - Show on PDF.
This would then reference a single set of Tables, 1 for each additional child. Meaning whether the Student has 1 child, 3 children or 5 children, it will always show at least Table 1. Opposed to creating 5 different sets of Tables and showing a different set of Tables depending on the number of children identified, which would cause numerous empty columns to be created within the Work Queues on the back end.
FORM EXAMPLE that uses these Rules can be found in:
- Organization: eForm Designer Sandbox
Form Name: 0 - (Example Forms) Ph.D. Family Support Enrollment Form - Phase II
Form Items: Children_Number; Children_Table
Rules: Rules 7 - 16 where it’s configured to show an additional table as the Children_Number increases.
WORK-AROUND 1 - Reference the same Action in different Rules
Each rule must reference a different Action. Therefore, you cannot have more than one rule that references the same Action.
Problem:
Lets say you want to SHOW FormItem1 when conditions ‘A and B’ are met AND when conditions ‘C or D’ are met. The Rules would look like:
- IF A AND B are met;
IF C OR D are met;
THEN SHOW FormItem1.
- But you cannot include both an AND operand with an OR operand within the same Rule condition.
If you wanted to split it into 2 separate rules, it would look like this:
- IF A AND B are met;
THEN SHOW FormItem1.
- IF C OR D are met;
THEN SHOW FormItem1.
- But you also can’t create 2 Rules that reference the same Action.
So what do you do if you can’t find a legit way to configure the rules knowing you must reference the same Action = Show FormItem1?
Work-Around:
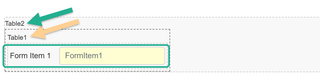
To get around this, you can embed the Form Item within a Table and continue embedding within another Table for as many times as you need to reference that Action. Therefore, one Rule can reference the Form Item itself, another Rule can reference the first Table, another rule can reference the second Table and so on.
Embedding a FormItem1 within a Table (Table1), embedded within another Table (Table2) would look like this: